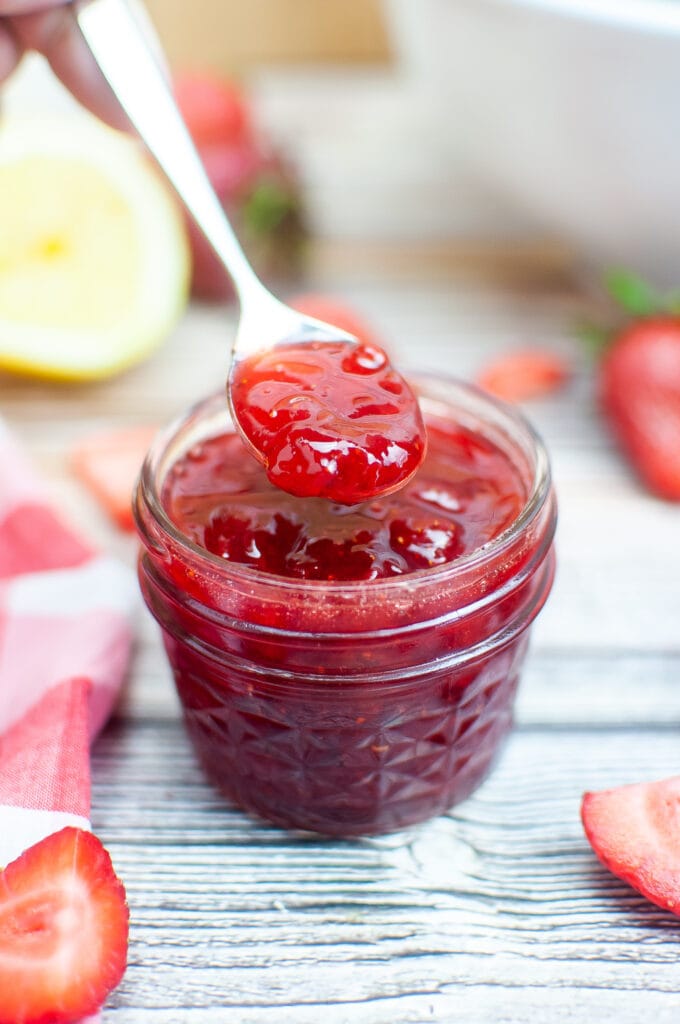
Quick and easy to make! You’ll savor the flavors of summer with our small batch strawberry jam, crafted without the need for pectin or butter. Each jar captures the sun-kissed sweetness of handpicked strawberries, allowing their natural flavors to shine. Spread the love on your morning toast or freshly baked wheat bread. This is a small batch jam recipe allowing you to make a small jar to keep and another to share!
Small batch jam is like a mini culinary adventure! With less quantity, it’s manageable and quicker, turning the jam-making process into a stress-free experience. You get to experiment with flavors, ensuring each jar is unique and delicious. Plus, it’s so rewarding to savor the fruits of your labor without drowning in excess jars!
I have fun experimenting with various fruits to make jam and fruit butter in small batches. Spread some blueberry chia seed jam on hot homemade white bread, and maple pumpkin butter is perfect for cinnamon raisin bread or a maple walnut loaf. I love this small batch strawberry jam with orange cranberry yeast bread made in the bread maker.

Making small-batch jam is the easy fun way to actually enjoy the process… and the yummy final product! I remember Jam Day, a major annual event when I was a little girl: heading to Grandma’s house, the back seat of our car over–stuffed with large baskets of freshly picked berries and various fruits of the season, hearts full of anticipation and anxiety for what was sure to be a busy, chaotic, day!
My job was to stay in the other room minding the babies, keeping them out of harm’s way, while my mother and grandmother preformed their canning magic in the kitchen. And though my grandmother was a gentle woman, I don’t think the words I heard coming from the other room were always jam-making loving spells…
And no wonder! With all the prepping and sweating over a hot stove while stirring a very large pot of hot sticky sugary fruit, then ladling, and boiling… and then repeating again and again till all of all the filled jars lined Grandma’s kitchen countertop while we all listened carefully to hear the distinct POP from each jar heralding jam-making success, there was bound to be some frustration!
This, my friends, is NOT one of those jam recipes. You can easily make small batch strawberry jam with no fuss and little stress. Your family will enjoy the bright sweet strawberry taste on biscuits or toast without the…colorful words.
Ingredients needed to make small batch strawberry jam
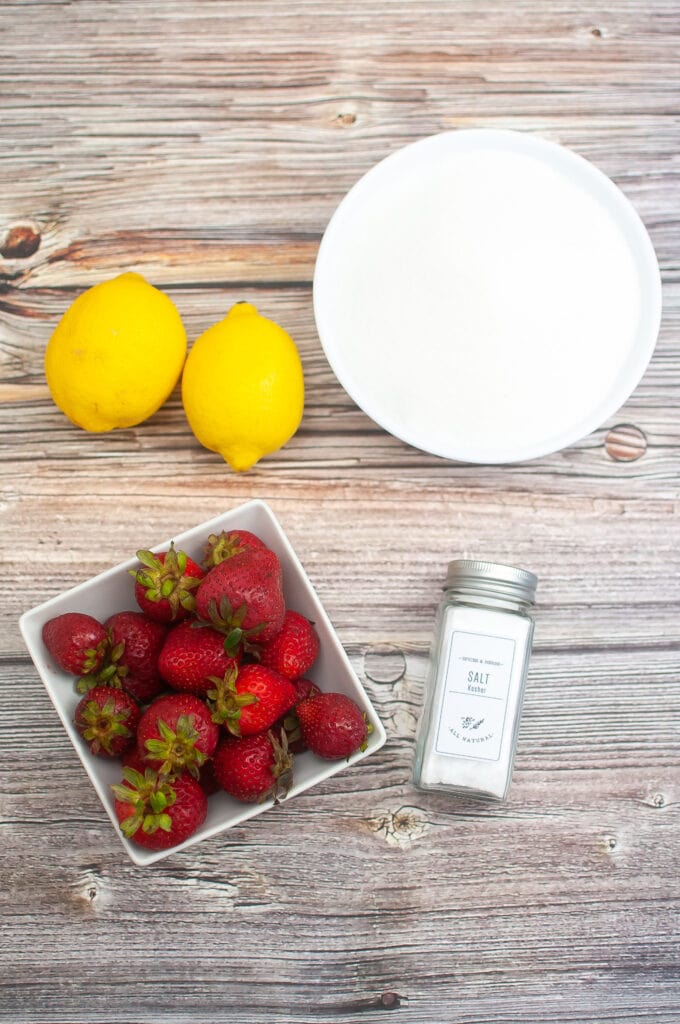
- 16 ounces strawberries (plus extra in case of spoilage)- You can use fresh strawberries or frozen (unsweetened) strawberries. If you use frozen strawberries the water content might be a little different and you’ll need to adjust the cooking times.
- granulated sugar – Use organic sugar if you are a sugar vegan.
- lemon juice – Use fresh or bottled lemon juice. If you use fresh lemon juice then you’ll need two large juicy lemons to make sure you get a full three tablespoons.
- salt – Yes, you’ll need a little salt to bring out the sweet flavor. Weird how that works:)
- Notice: NO pectin and NO butter! Butter is an often-used in jam making because it helps to tame the foamies that develop during the cooking process. I’m not sure if it’s because we don’t use pectin with this recipe or that we don’t cook it quite as long, but the foam produced in the process is minimal and easily stirs in once it’s cooled. And pectin is not necessary.
- A candy thermometer is super helpful for this recipe – or you can do the “gel test” (see below).
- potato masher or immersion blender
How to make your own small batch strawberry jam
The exact ingredients with measurements can be found in the recipe card below along with more concise abbreviated instructions. Read on for more details, tips, and tricks so that you will feel confident making this recipe.
Step 1: Decide on using a candy thermometer, gel test, or both
Decide if you are going to use a candy thermometer or do the gel test to know if your jam is has been cooked enough to set up properly. When the jam is fully cooked and still hot it’s super runny and more like lumpy strawberry syrup than jam. It’s only when it’s been cooled completely in the fridge overnight – or for a minimum of six hours – that we know how it’s actually going to set up the way we’d like.
I prefer my jam to be a little more runny than the super thick jam you can buy in the grocery store. Store-bought jam seems almost rubbery to me. You might like yours thicker than I do. Instructions for both outcomes are given below.
You will need to either use a candy thermometer or do the gel test on a cold plate. If you are an inexperienced jam maker, you might want to do both the first few times until you know how you like your jam and what will give you to best outcome.
If you are doing a gel test (which I highly recommend even if you are using a thermometer ) then put several very small plates in the freezer. Plates made of glass or ceramic of some sort is better than plastic plates because they better conduct the cold. I do not recommend you use paper plates.
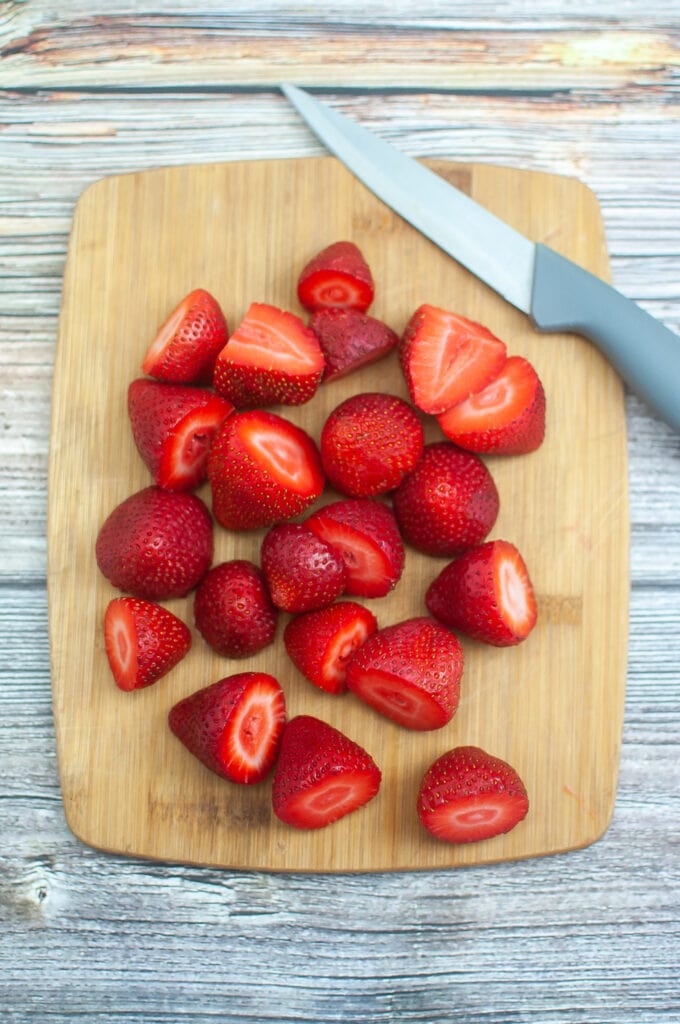
Step 2: Prepping the strawberries
Wash the berries and cut the green leafy tops from each strawberry. I also cut the larger berries in half to make them easier to mash later on. If I have any spoiled berries I throw them out or cut out any small spoiled pieces from individual berries. It’s good to have extra berries on hand just in case you need to throw out too many yucky ones. You can always use the extra berries in a smoothie or use them in this yummy Very Berry Salad or Fresh Fruit Salad with Poppy Seed Dressing.
Steps 3 and 4: Cook the berries and other ingredients
Juice the lemons or use bottled real unsweetened lemon juice. I’ve done it both ways and haven’t noticed any difference in the final outcome. You will need a total of three tablespoons of lemon juice. If you use fresh lemons then choose two large juicy lemons. I love this handy citrus juicer for juicing just a couple of fruits. It’s small enough to fit in a deep drawer and cleans easily by running water over it it or popping it in the dishwasher.
Place the prepared strawberries, sugar, lemon juice, and salt in a medium-sized saucepan and cook over medium heat. Stir it regularly until the sugar has dissolved. This will take about four to six minutes. You will get some bubbling and boiling during this process, but mostly on the sides on the pan.

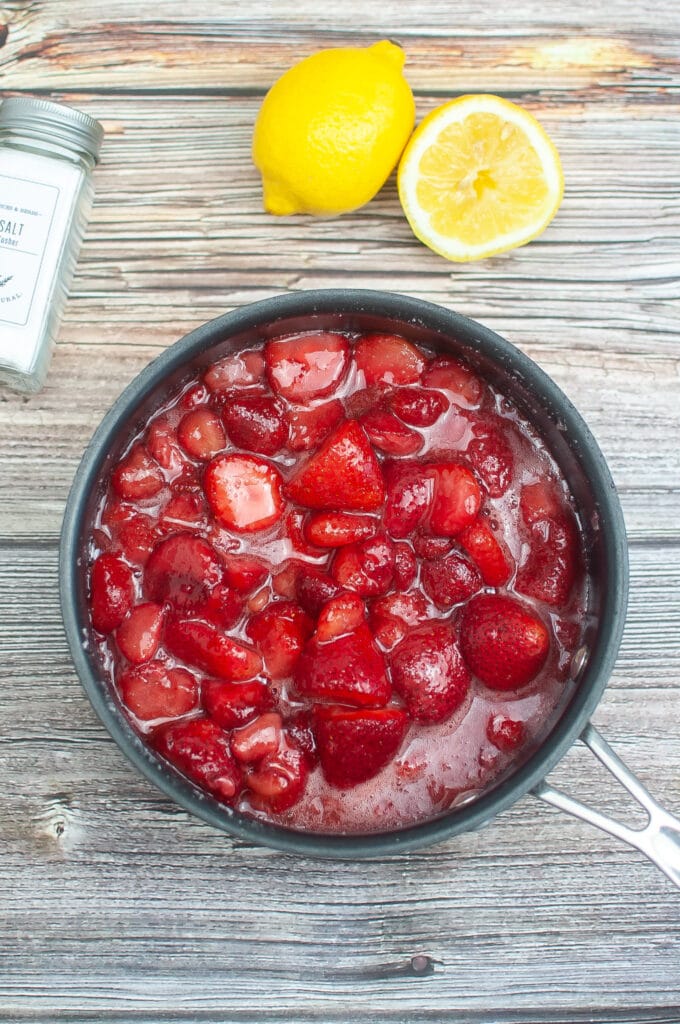
Once the sugar has completely dissolved, mash the strawberries into small bits with a potato masher. The fun of making your own jam is that you get to decide if you’d like jam to have lots of larger chunky berries or smaller mashed little berry bits. I like my jam a little chunky and so that’s how I mash it. You might like finer bits for your jam. Either continue with a masher until your arm is tired of mashing or use an immersion blender for quicker easier blending/mashing.

Bring the jam to a low boil, turn the heat down to medium/low, and allow for a gentle boil without stirring for about 15 -20 minutes. If you are using a candy thermometer, cook until it reads 210°F – 215℉. OR you can do the gel test – see the next step.
Be aware that many jam recipes call for 220°F reading on the candy thermometer. This makes jam that is too thick for my liking. My jam is a little looser than store-bought jam when you cook it to 210°F. If you want your jam to be super thick like store-bought jam then wait until the thermometer reads 220°F. This will take at least 30 minutes of cooking at a low boil.
Step 5: The gel test
If you don’t have a candy thermometer you can always do it the old-fashioned way like my grandmother taught me, by doing the cold plate gel test. Remember those small plates you put in the freezer before starting? Let’s get ready to use them now!
If you choose to do a gel test instead of using a candy thermometer, do your first test at about 12 minutes…just in case it’s ready.
Turn off the stove while you complete the gel test. Spoon a small amount (one-half teaspoon) onto the cold plate. Return to the freezer for two minutes. Tilt the plate to see if the mixture runs down the plate quickly or if it very slowly creeps.
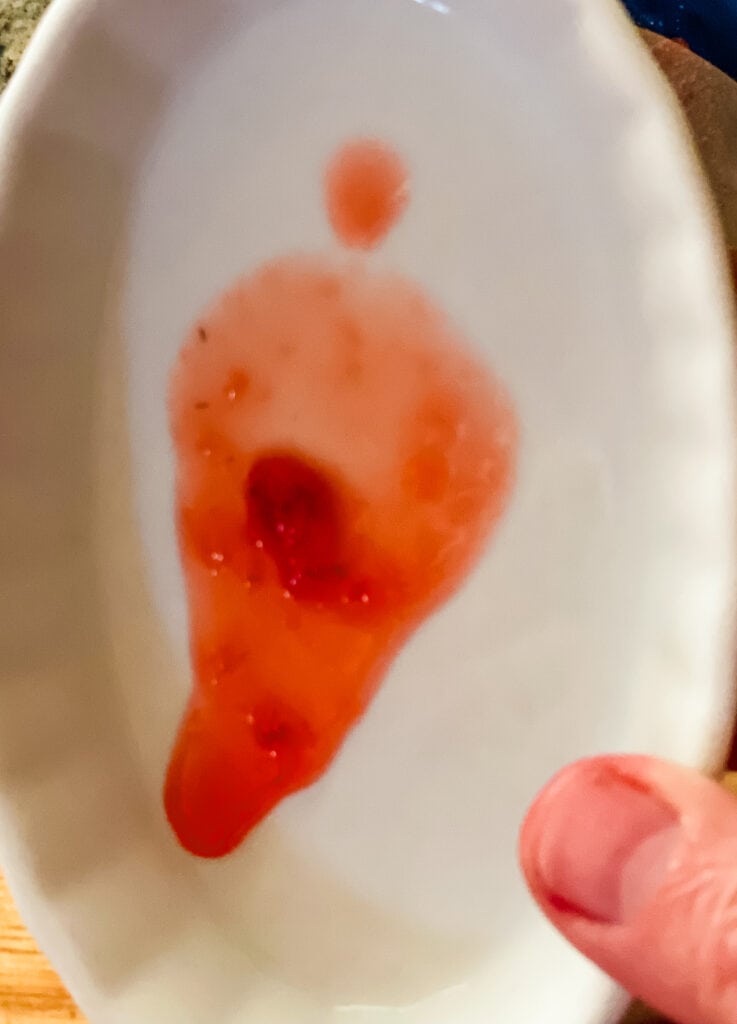
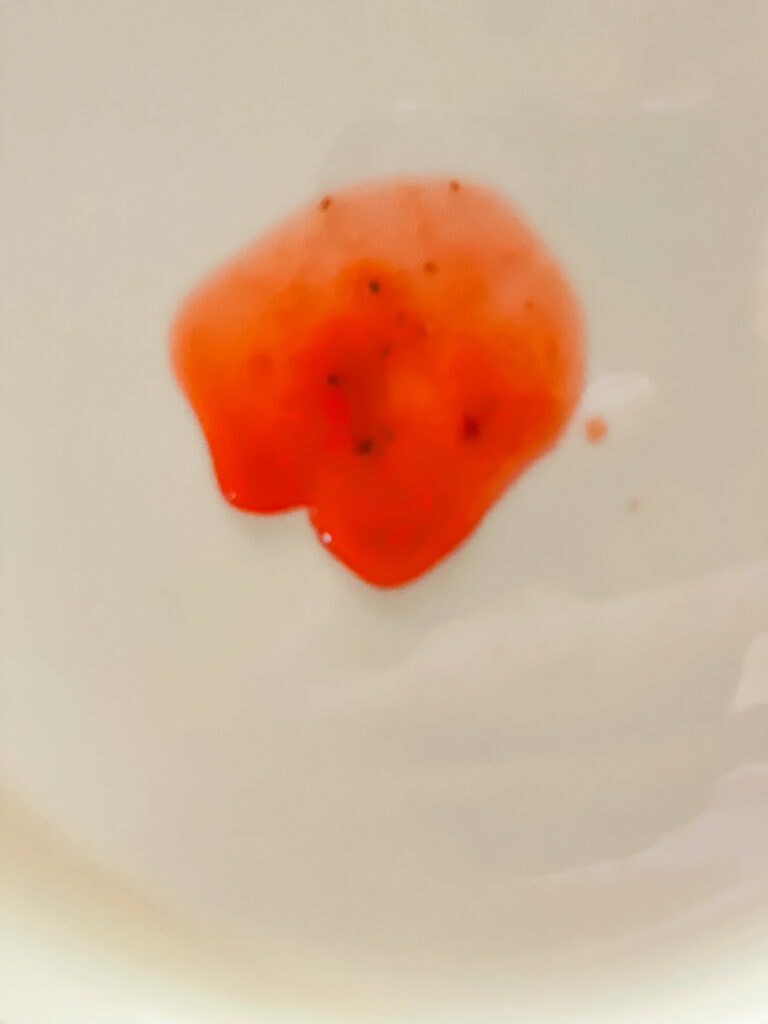
If it runs quickly, return the mixture to a quick boil and then immediately turn it down to a simmer for another minute or two. Try the test again. You might need to try a third time. You should not need to try a forth time.
If, after completely cooling, you still feel your jam is too runny, you can always pop it back into the saucepan and bring to a boil for a few minutes again.
Step 6: Place cooked jam into jars
Remove the jam from the stove-top and let cool for about 30 minutes until it’s easier to handle without burning yourself. Give it a stir before pouring the mixture into the jar/s.
This is a small batch jam recipe but I prefer to use two smaller jars rather than one large jar. It will keep refrigerated about two weeks after opening and up to a month unopened. When I make two small jars it’s nice to save one for me and gift the other to a friend along with a warm loaf of home cooked no knead cinnamon raisin bread or orange cranberry bread made in the bread maker. Sharing is caring:)
The printable recipe card
Did you love this recipe?
Want to share the love? It would be great if you could leave five ⭐️ ⭐️ ⭐️ ⭐️ ⭐️ stars and even a comment. Did you know that this will help Google to find this recipe when others are looking for something similar? Thanks, Cindy

Small Batch Strawberry Jam, No Pectin and No Butter
Equipment
- candy thermometer OR do the gel test
- potato masher or immersion blender
Ingredients
- 16 ounces strawberries
- 1 ½ cups granulated sugar
- 3 Tablespoons lemon juice use fresh or bottled
- ¼ teaspoon salt
Instructions
- Place several small plates or flat bowls in the freezer for the gel test after the mixture cooks (if you are doing the gel test).
- Prepare the strawberries by washing the berries and cutting off the tops. I also cut very large berries in half.
- Squeeze the lemons if using fresh lemons. Place the prepared strawberries, sugar, lemon juice, and salt in a medium-sized saucepan and cook over medium heat. Stir it regularly until the sugar has dissolved. This will take about four to six minutes.
- Once the sugar has completely dissolved, mash the strawberries into small bits, bring the jam to a low boil, turn the heat down to medium/low, and allow for a gentle boil without stirring for about 20-25 minutes. If you are using a candy thermometer, I cook until it reads 210℉ (see notes). OR you can do the gel test – see the next step.
- If you choose to do a gel test instead of use a candy thermometer, do your first test at about 18 minutes. Turn off the stove while you complete the gel test. Spoon a small amount (one-half teaspoon) onto the cold plate. Return to the freezer for two minutes. Tilt the plate to see if the mixture runs down the plate quickly or if it very slowly creeps. If it runs quickly, return the mixture to a quick boil and then immediately turn it down to a simmer for another minute or two. Try the test again. You might need to do it a third time. You should not need to try a fourth time. See notes for another freezer test.
- Remove the jam from the stove top and let cool for about 30 minutes until it's easier to handle. Give it a stir before pouring the mixture into the jar/s. Store the jam in the fridge for up to one month unopened. Once it's been opened, try to consume within a week or so.
