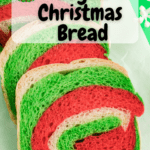
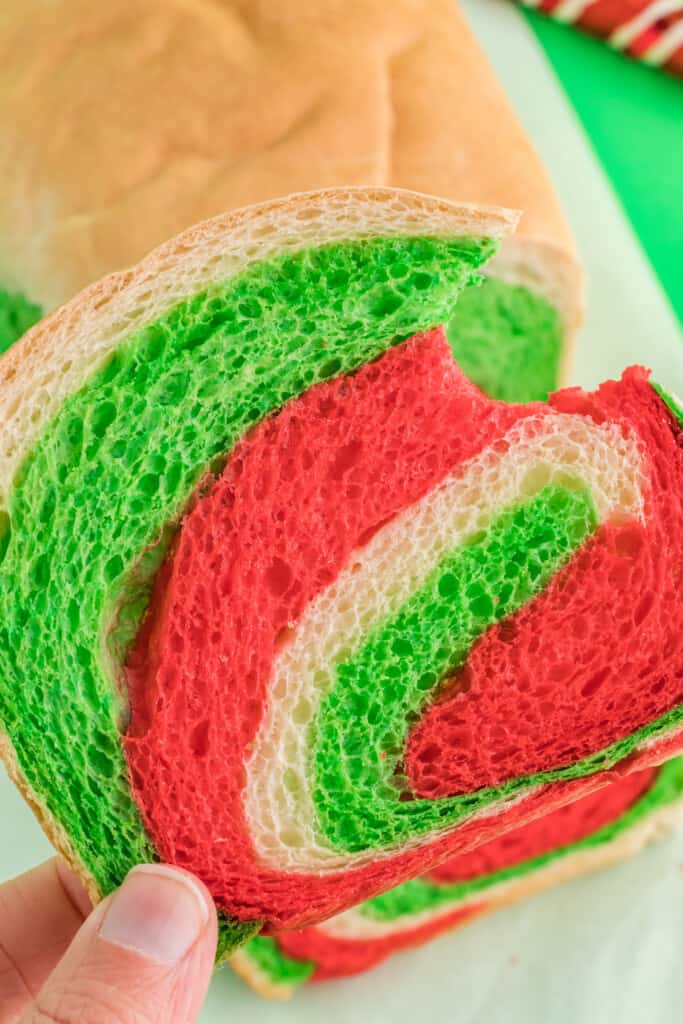
This festive red and green vegan Christmas bread is as easy to make as it is colorful! Made with bake-and-serve bread and colored with red and green gel food colorings, you mix it together in a stand mixer with a dough hook. Layer and roll, let it rise, and bake. You’ll have a colorful lovely Christmas swirl bread on the table in no time.

I wanted to make a special loaf to serve on Christmas morning for my annual holiday brunch buffet. Along with my Cinnamon Swirl Bread (coming soon), Cranberry Orange Yeast Bread, tasty vegan Chocolate Chip Banana Nut Bread, and Pumpkin Muffins, this savory festive loaf rounds out my vegan bread offerings.
Pin now to save for later:
Ingredients needed to make your own easy vegan Christmas bread with red and green swirls
- one-pound loaf of bake-and-serve bread – For my vegan readers: The only bake-and-serve bread that I’ve found that is remotely vegan is Rhodes Bake-N-Serv White Bread. Rhodes is known as “accidentally” vegan on many websites including the Spoonful App. There are a few issues with this however, depending on your level of veganism. Rhodes is potentially manufactured on shared equipment – which is a problem if you are allergic to dairy. One of the ingredients listed is “enzymes” which can be from an animal source…or a plant source. If this is not within your ethics then use any homemade white bread recipe. Prepare as directed up to the final rising and color your dough before then. This vegan white bread machine recipe is perfect for the job. Simply use the “dough” setting. Remove from the bread machine and proceed with the recipe.
- red and green gel food coloring – Luckily, most food coloring is vegan. You need to watch out for carmine in red food dye which is made from crushed beetles, but that is not so common anymore. Other than that, you should be good! I use Ann Clark Professional Food Coloring Gel which states that it is vegan.
- all-purpose flour – You will only need a little bit when mixing in the colors.
- Very importantly! You will need a stand mixer with a dough hook to mix in the colors. While it can be done, it would be very challenging to mix in the color by hand.

How to make your own Christmas red and green swirl bread.
The exact ingredients with measurements can be found in the recipe card below along with more concise abbreviated instructions. Read on for more details, tips, and tricks so that you will feel confident making this recipe.
Thaw the dough
Most bake-and-serve bread dough comes frozen. I set a loaf in the fridge overnight to thaw. I just zip it in a gallon-size plastic baggy and it doesn’t stick to the bag when thawing. I set the loaf out on the counter for about 30 minutes to bring it closer to room temperature before preparing it just to take the chill off.
Grease a bread loaf pan with vegetable shortening or cooking spray. I also sometimes use a large piece of parchement paper for cooking. No need to grease if you are using parchment paper as long as it covers all surfaces of lhe loaf pan.
Mix the colors
Make sure your loaf is fully thawed. I set it out on the counter for about 30 minutes to bring it to room temperature. This time is included in the prep time.
Separate the loaf into three equal pieces. You will be coloring one of them red, one green, and leaving one white. If one piece is a little larger than the others, I make this the white piece.
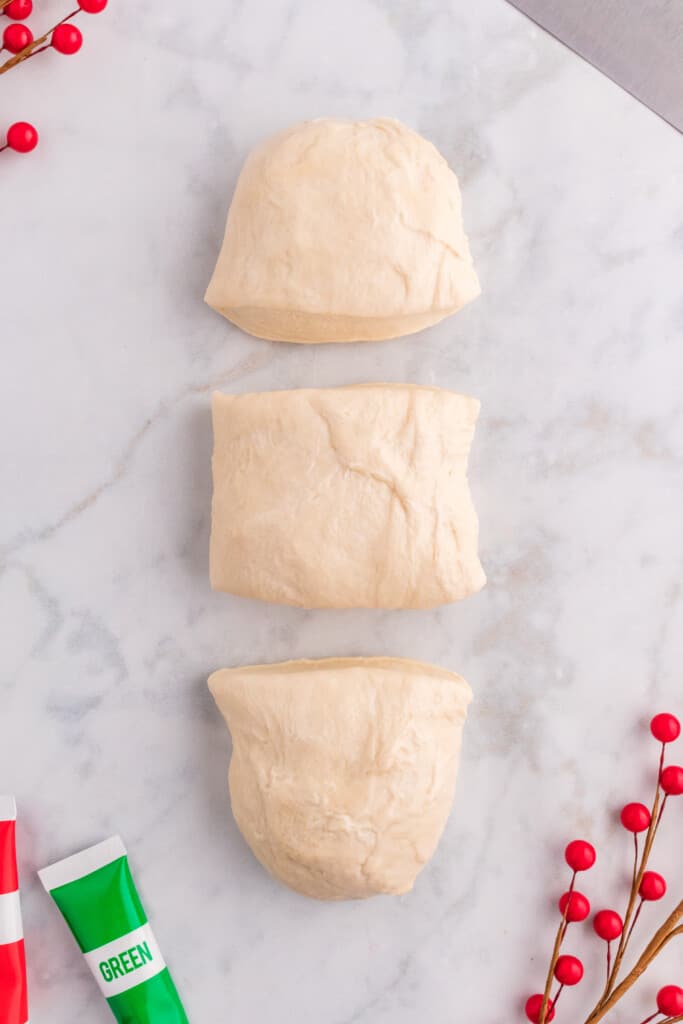
Place one of the three pieces in the stand mixer bowl and insert the dough blade. Add one teaspoon of green food coloring and one-half tablespoon (or half) of the flour. Mix on high speed for several minutes, adding more coloring if desired.
If the coloring is not mixing in well, tear the dough into little pieces and remix. You can also knead it in my hand for a few minutes after mixing. If the color is a little streaky it will still look pretty when cooked

Repeat with the red coloring and the second ball of dough. You now have three balls of dough – one green,one red, and one white.

Roll the dough
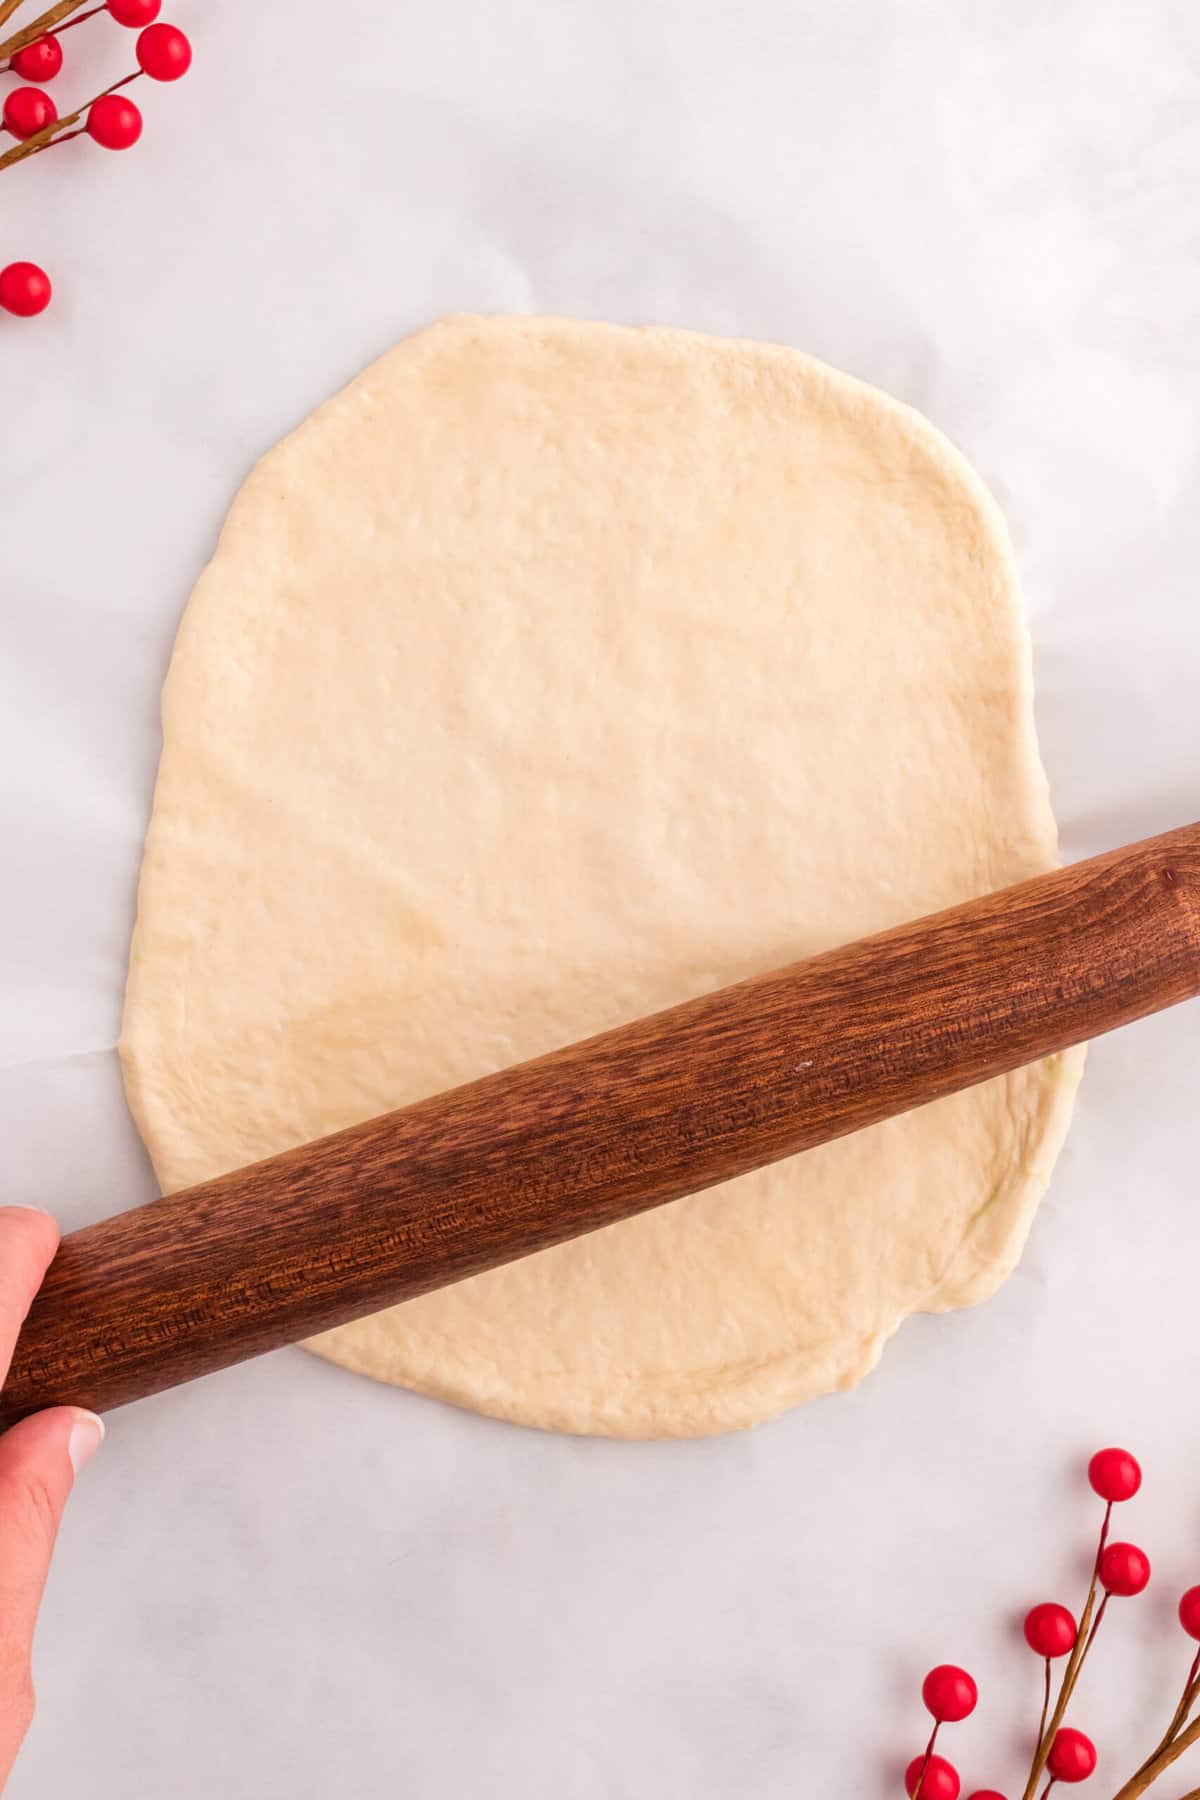
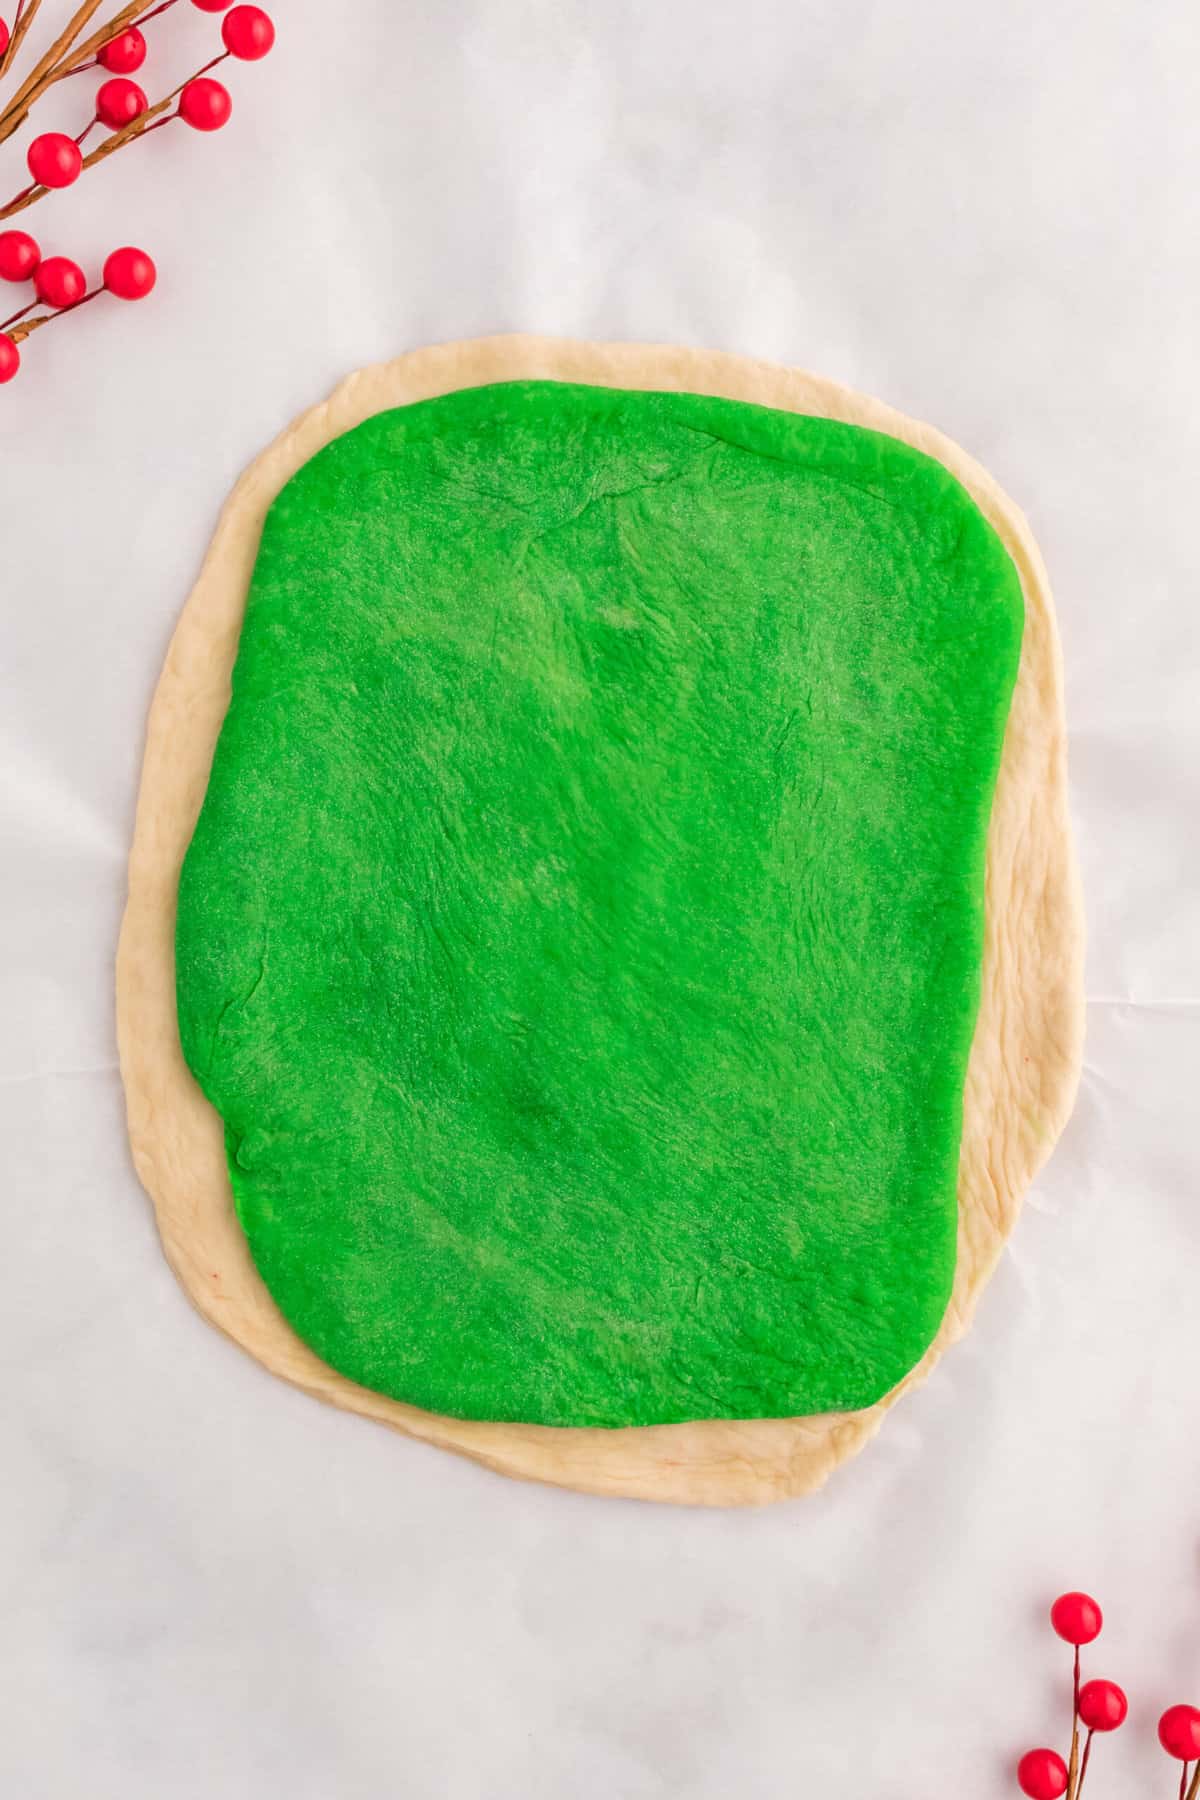
Use your hands to press out or a rolling pin to roll out the white dough into an 8-inch wide rectangle. Work on a floured surface and use a little flour on the rolling pin to keep the dough from sticking. Set the white dough rectangle aside.
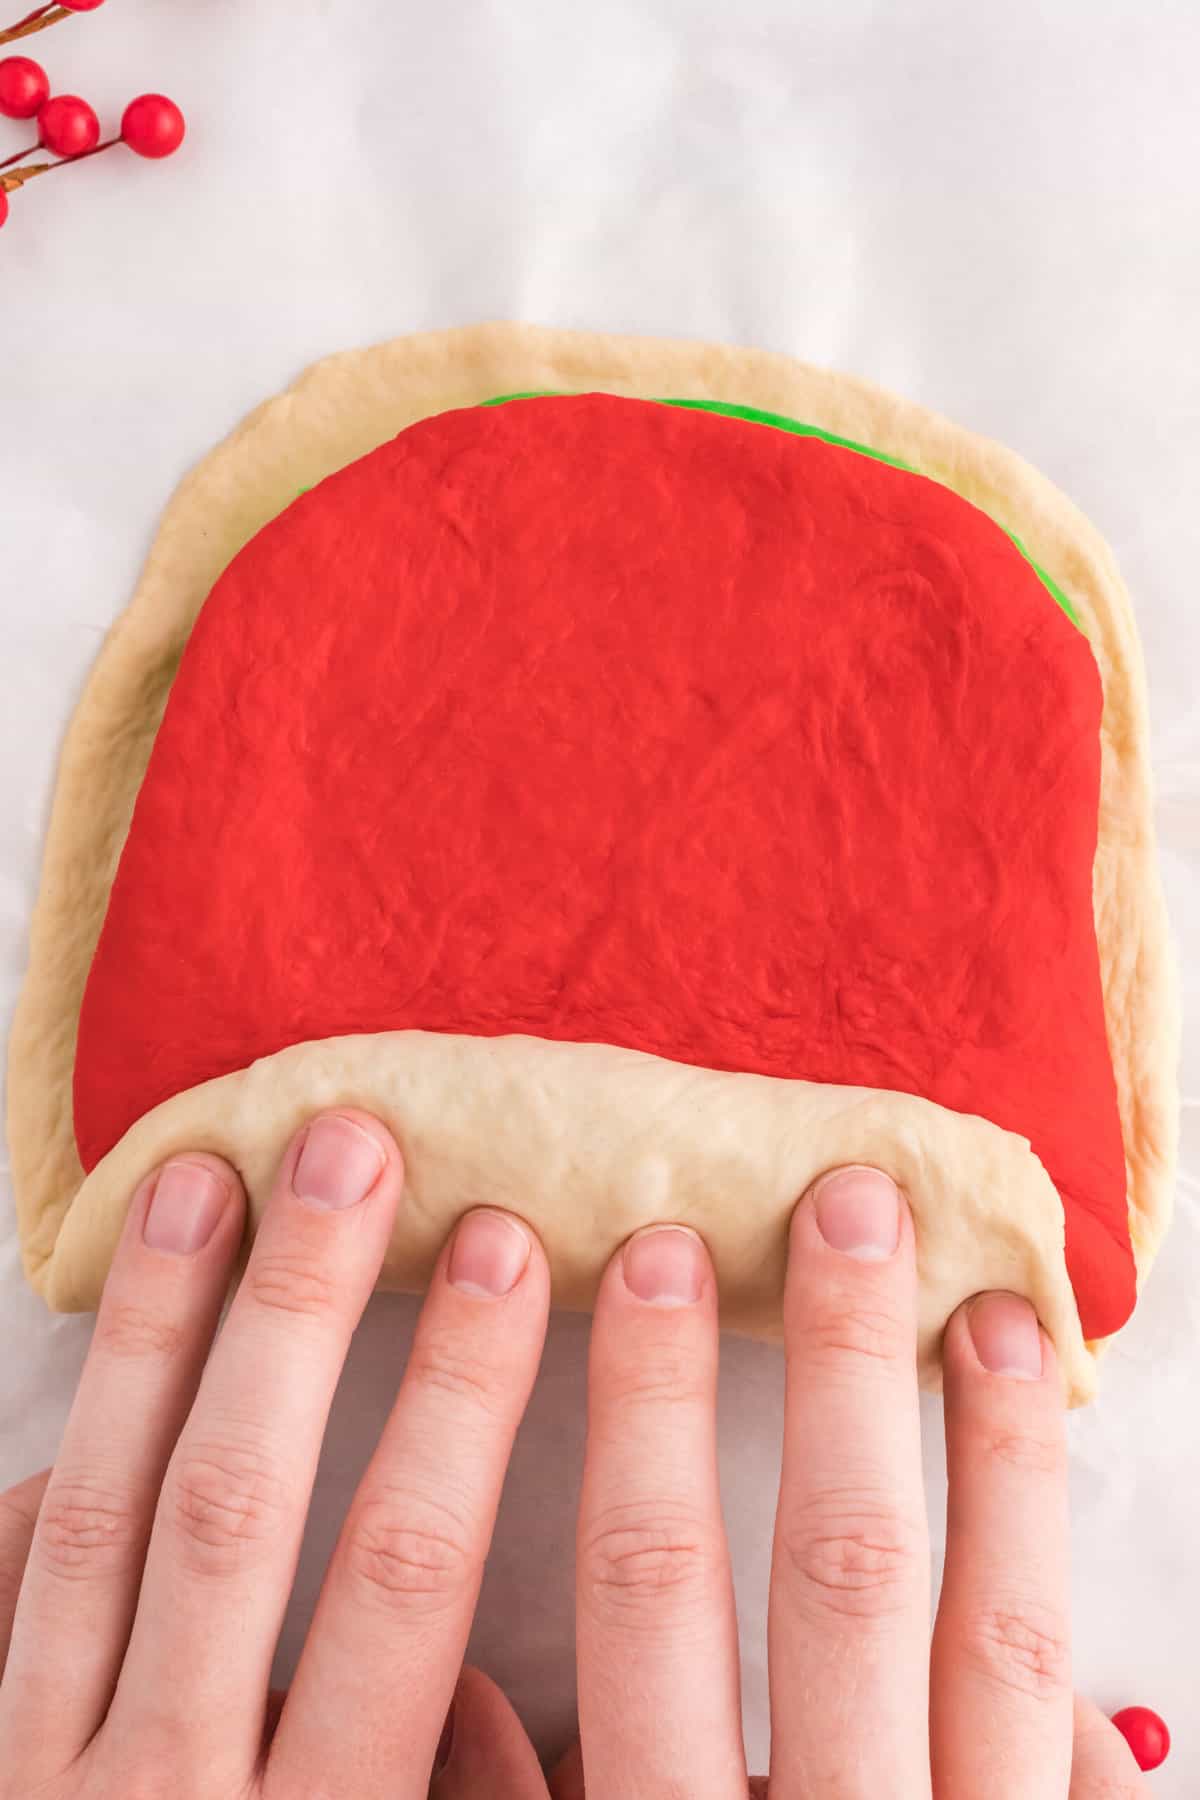
Roll the green ball out the same as the white one and set the green rectangle on top of the white one. Roll the red dough the same as the green dough and layer it on top of the green. The white bottom layer should be slightly larger around the border than the other colors.

Roll into a loaf
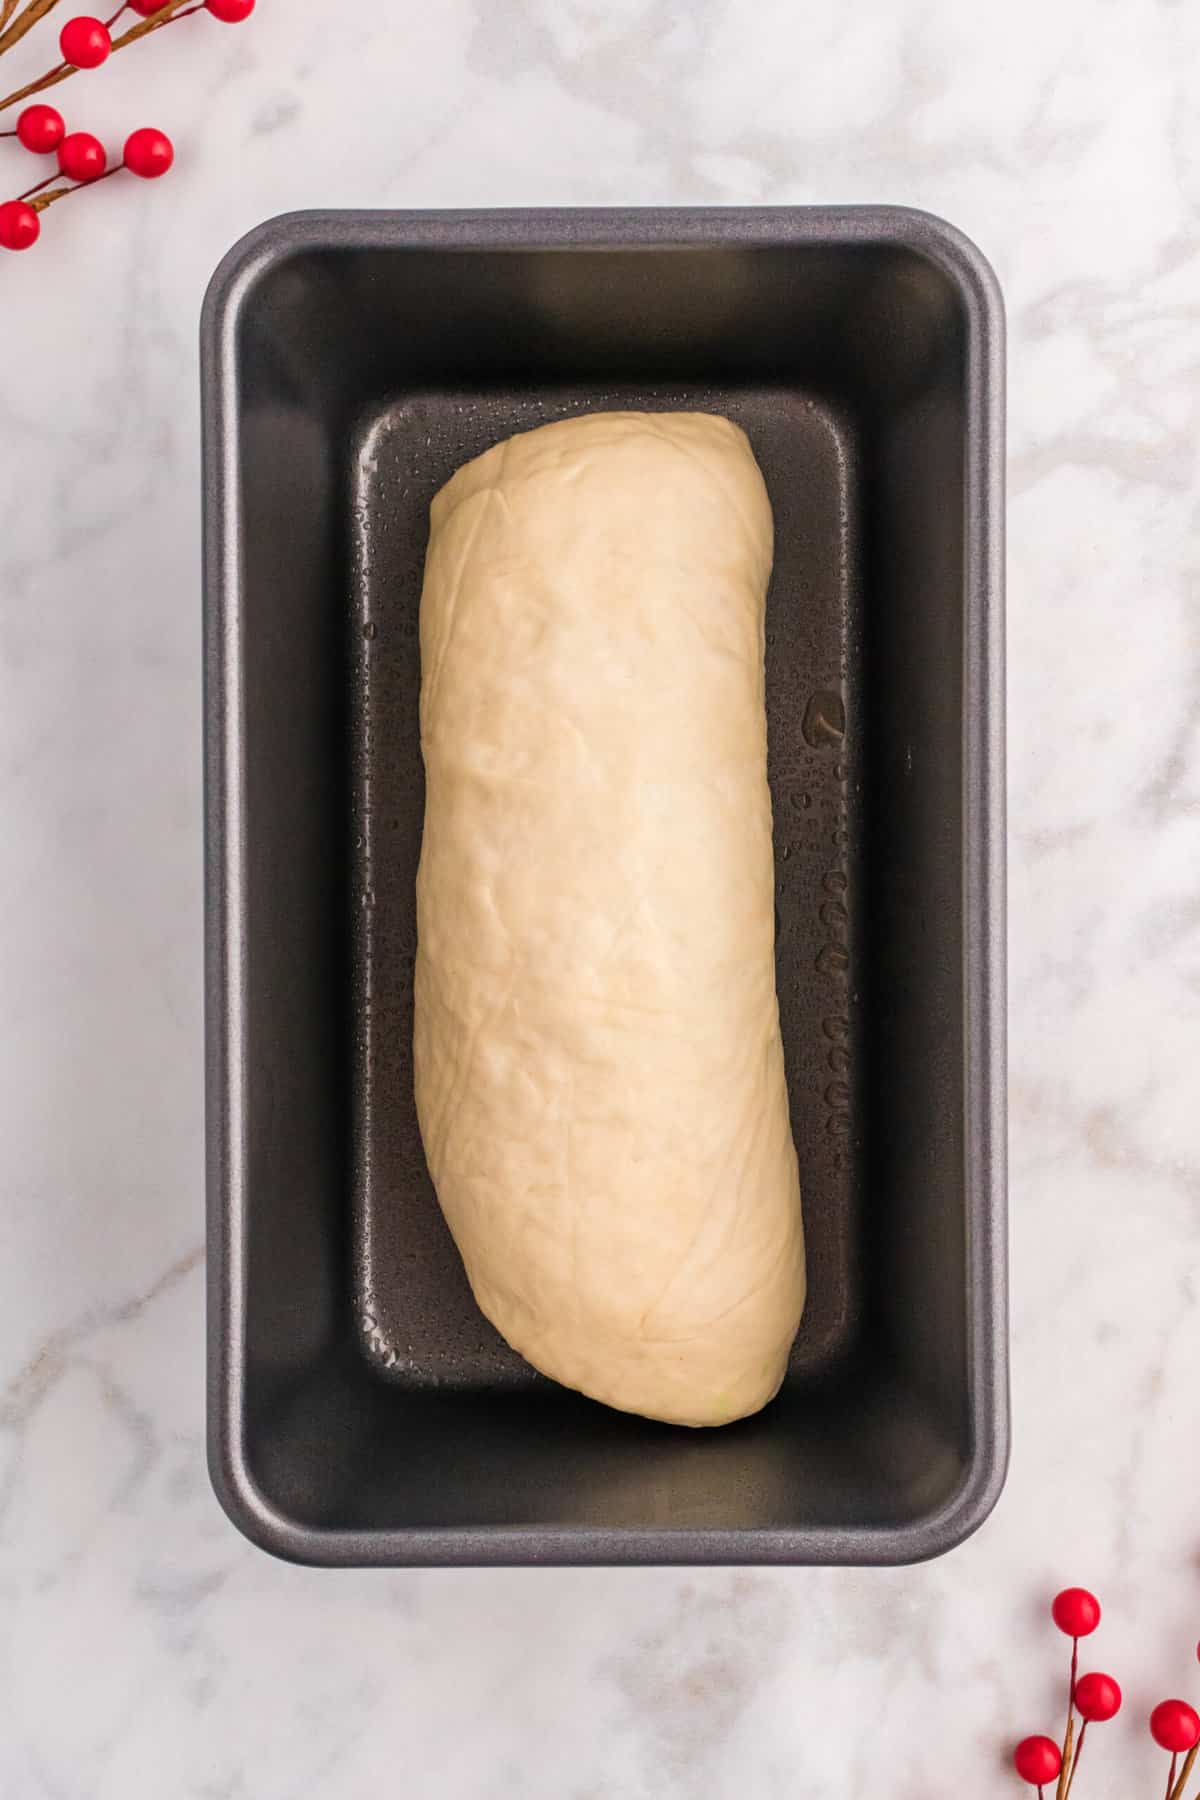
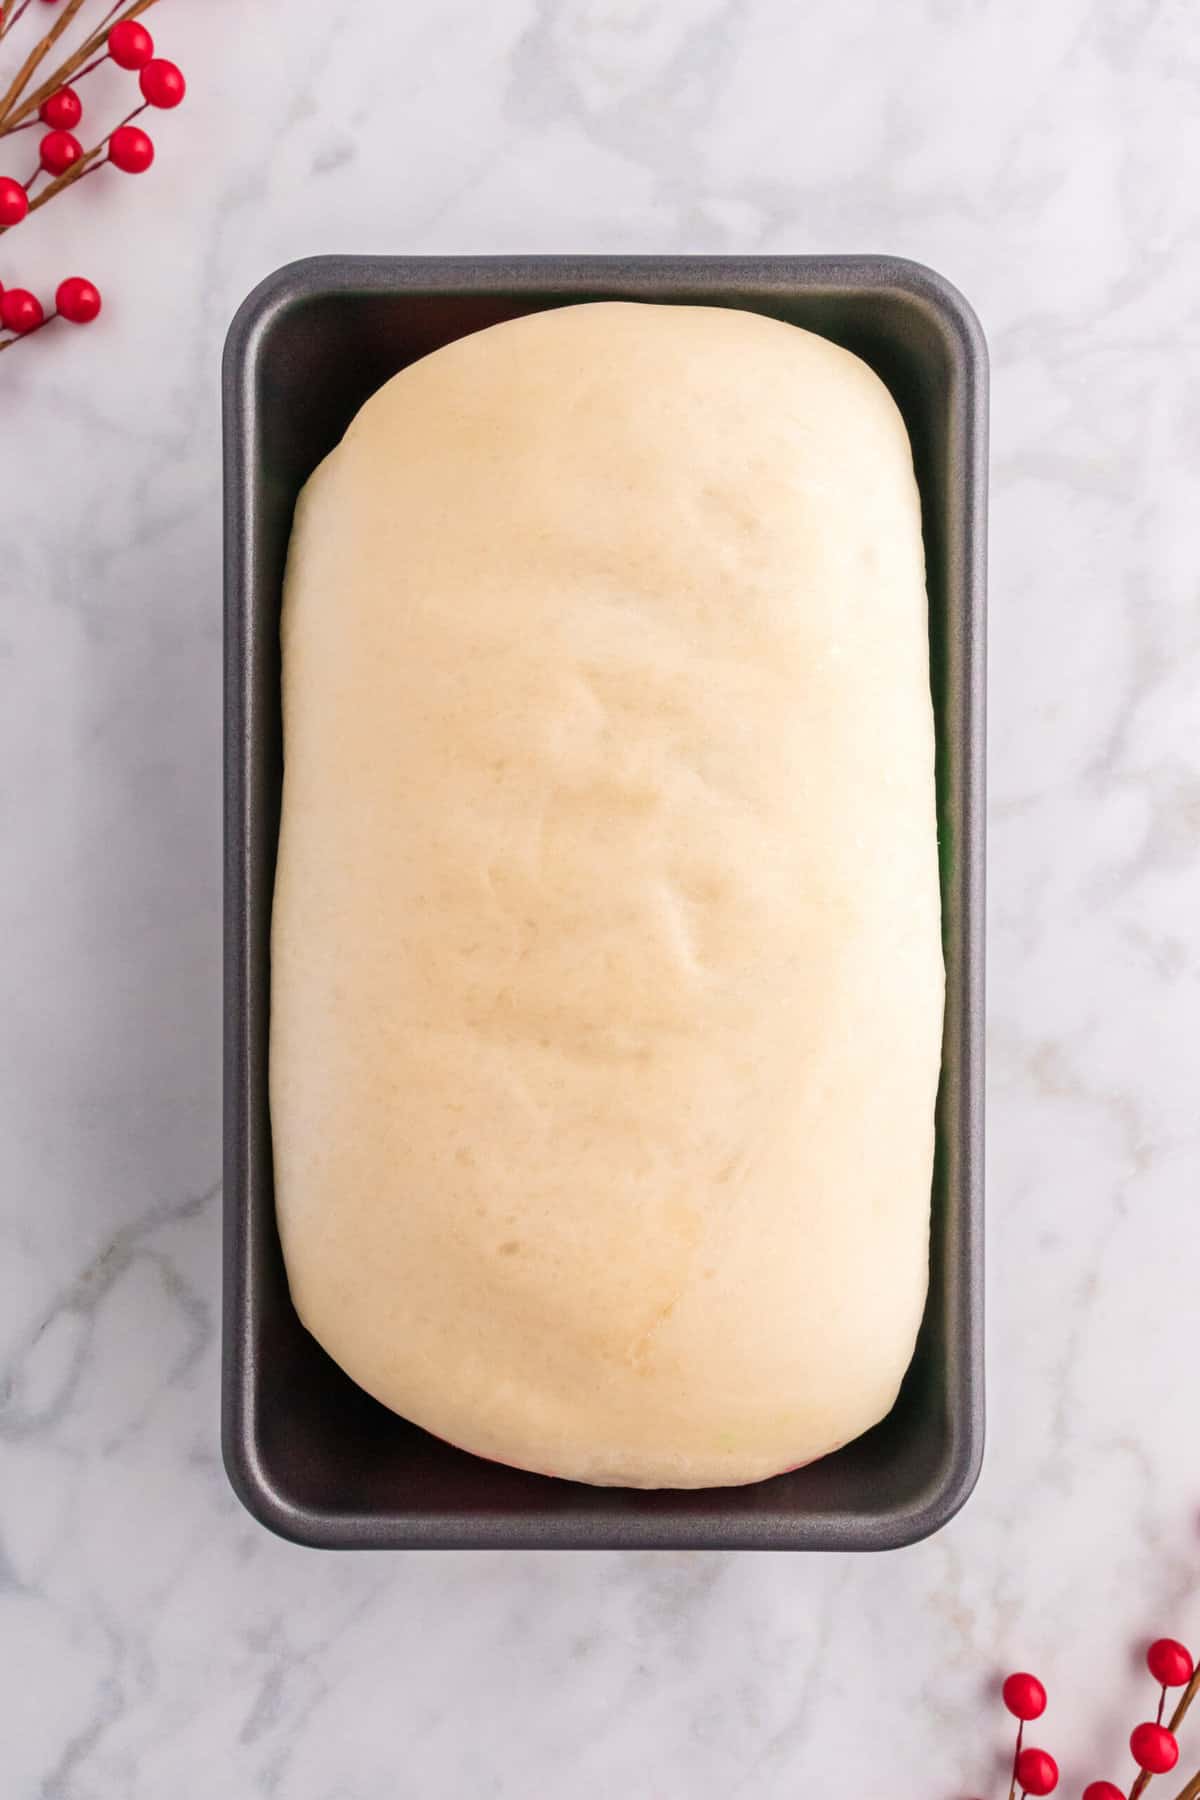
Tightly roll the layered dough, starting from the bottom so that it stays 8 inches wide. Roll it into a loaf and place it in the prepared loaf pan.
Time to rise!
Now begins the long rising time! This loaf of vegan Christmas bread is easy to make, but it can be a little time consuming.
Wet a towel and ring it out well. Cover the loaf pan with the damp towel and set it in a warm draft-free area. Let rise for about two hours.
Check the loaf after an hour and a half and see if it is ready yet. You’ll know because the dough will have doubled in size and the dough will pass the poke test. Sometime toward the end of the rising process, preheat the oven to 350°
This article by Bon Appetit explains the poke test. The poke test is a really good way to tell if the bread has risen enough and is ready to bake.
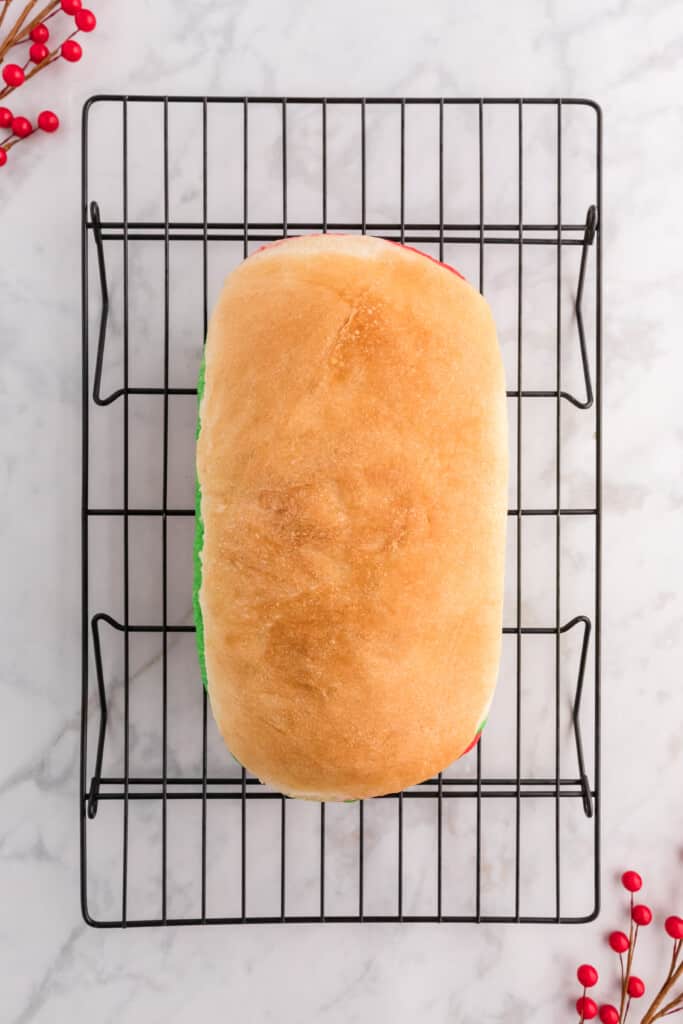
Bake your vegan Christmas bread
Place the prepared and risen loaf in a preheated oven and bake for 20-25 minutes. The bread will have risen about an inch above the pan and will be nice and brown.
When you tap on the top it will hard and sound a little hollow. The top will soften as it cools. It’s tempting to cut and eat hot with vegan butter slathered on top. Try to hold off until it’s cooled enough that you can cut the loaf without squishing the bread!
Some questions and answers about making this vegan Christmas bread
Any ready-to-bake frozen/fresh dough should work great. If you are vegan, then Rhodes Bake-N-Serv bread is known to be “accidentally” vegan. See the above blog post for reasons it might not be as vegan as you’d like. I am working on and will post a recipe for my own bake-and-serve type of loaf soon. In the meantime, you can use any white bread recipe. Just mix in the colors before the final rise.
If you don’t have a stand mixer you can mix the color in by hand. It will take a really long time though.
This can happen. You can tear the dough into pieces and remix with the dough handle or work it in by hand. Honestly, sometimes mine is a little bit streaky. It still cooks nicely so I wouldn’t worry about it.
It will take up to two hours. If your house is especially hot then as little as an hour and a half. Check it often toward the end and use the poke test.
Store your vegan Christmas bread for no longer than three days in an airtight container.
Some more delicious vegan Holiday treat from Veggie Fun Kitchen
- Creamy Cannoli dip – rich and creamy and made with silken tofu and all the right seasonings. Dip crackers, cookies or fruit
- Instant Pot Cinnamon Apple Dumplings – So easy to make with canned crescent rolls
- Instant Pot Peppermint Hot Chocolate – Divine and dreamy! This peppermint hot chocolate is made with coconut milk.
- Cranberry Bliss Bars – these are a copycat from your favorite coffee shop!
- Scotcheroos – This is a veganized family favorite. Remember those yummy peanut butter Rice Krispy treats?
- Chocolate Peppermint Martini – Yes!
- The Best Vegan Eggnog – Made with a secret ingredient….pudding mix!
The printable recipe card
Did you love this recipe?
Want to share the love? It would be great if you could leave five ⭐️ ⭐️ ⭐️ ⭐️ ⭐️ stars and even a comment. Did you know that this will help Google to find this recipe when others are looking for something similar? Thanks, Cindy

Easy Vegan Christmas Bread with Bake-and-Serve Dough
Equipment
- stand mixer with dough hook
Ingredients
- 1 pound loaf bread dough
- 1 Tablespoon all-purpose flour divided
- 1 teaspoon green gel food coloring more if desired
- 1 teaspoon red gel food coloring more if desired
Instructions
- Thaw a one-pound loaf of bake-and-serve bread if not already thawed. I place one in a large baggy in the refrigerator overnight. Bring it closer to room temperature by setting it on the counter for about 30 minutes before making the bread.
- Grease a 9 x5 inch loaf pan with cooking spray or vegetable shortening.
- Make sure your loaf is fully thawed. I set it out on the counter for about 30 minutes to bring it to room temperature. This time is included in the prep time. Separate the loaf into three equal pieces. You will be coloring one of them red, one green, and leaving one white. If one piece is a little larger than the others, I make this the white piece.
- Place one of the three pieces in the stand mixer bowl and insert the dough blade. Add one teaspoon of green food coloring and one-half tablespoon (on half) of the flour. Mix on high speed for several minutes, adding more coloring if desired. See notes if the coloring is not mixing in. Set the green dough aside and clean the bowl and dough hook well.
- Repeat with the second piece of dough and the red coloring. Leave the third piece of dough white.
- Use your hands or a rolling pin to roll out the uncolored dough into an 8-inch wide rectangle. Work on a floured surface and use a little flour on the rolling pin to keep the dough from sticking. Set the white dough aside.
- Roll the green ball out the same as the white one and set the green rectangle on top of the white one. Roll the red dough the same as the green dough and layer it on top of the green. The white bottom layer should be slightly larger around the border than the other colors. See the blog post for photos.
- Again, please refer to the photos in the blog post. Tightly roll the layered dough, starting from the bottom so that it stays 8 inches wide. Roll it into a loaf and place it in the prepared loaf pan.
- Wet a towel and ring it out well. Cover the loaf pan with the damp towel and set it in a warm draft-free area. Let rise for about two hours. Check the loaf after an hour and a half and see if it is ready yet. You'll know because the dough will have doubled in size and the dough will pass the poke test. (See notes.) Sometime toward the end of the rising process, preheat the oven to 350°
- Place the prepared and risen loaf in a preheated oven and bake for 20-25 minutes. The bread will have risen about an inch above the pan and will be nice and brown. When you tap on the top it will hard and sound a little hollow. The top will soften as it cools.
- Take the bread out of the oven and remove the loaf from the pan. Wait until (mostly) cooled to cut or it will get smashed by the knife!